
magedu pro 第六周作业
1、请详细描述 CentOS 系统的启动流程(详细到每个过程系统做了哪些事情)。
由于篇幅过长,已单独写成一篇博客,详见:《CentOS 系统启动流程》
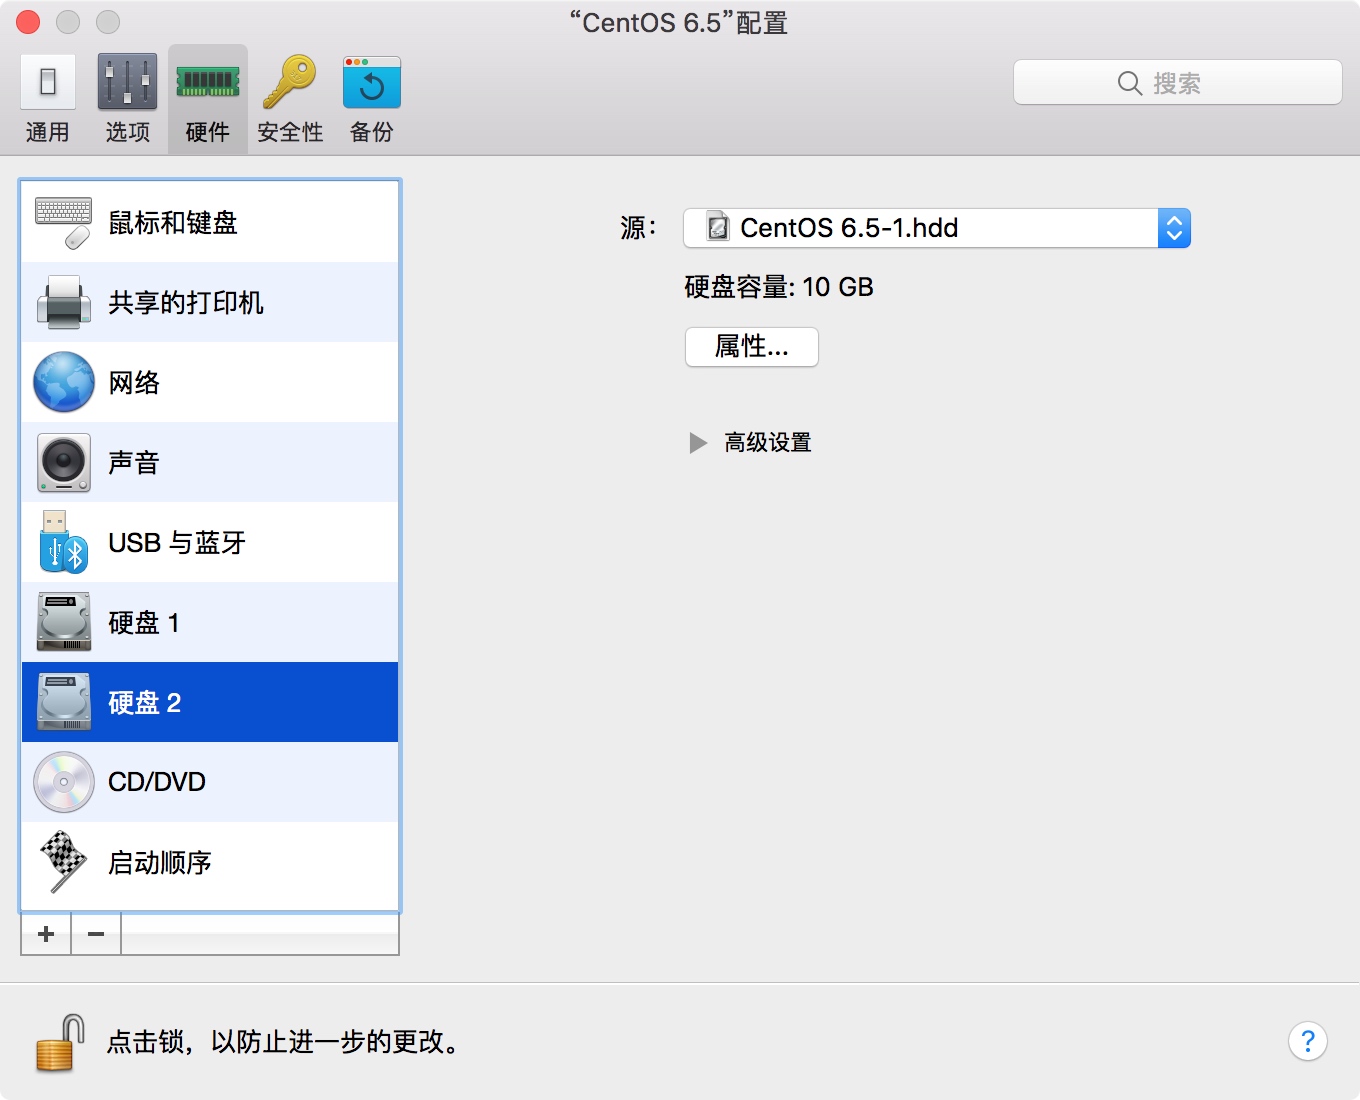
2、为运行于虚拟机上的 CentOS 6 添加一块新硬件,提供两个主分区。
- (1)为硬盘新建两个主分区;并为其安装 grub 。
- (2)为硬盘的第一个主分区提供内核和 ramdisk 文件;为第二个分区提供 rootfs 。
- (3)为 rootfs 提供 bash 、 ls 、 cat 程序及所依赖的库文件。
- (4)为 grub 提供配置文件。
- (5)将新的硬盘设置为第一启动项并能够正常启动目标主机。
步骤一:新增硬盘
 ### 步骤二:设定新硬盘分区
[hzz@magedu ~]$ sudo fdisk /dev/sdb
Device contains neither a valid DOS partition table, nor Sun, SGI or OSF disklabel
Building a new DOS disklabel with disk identifier 0xc6bb00a1.
Changes will remain in memory only, until you decide to write them.
After that, of course, the previous content won't be recoverable.

Warning: invalid flag 0x0000 of partition table 4 will be corrected by w(rite)

The device presents a logical sector size that is smaller than
the physical sector size. Aligning to a physical sector (or optimal
I/O) size boundary is recommended, or performance may be impacted.

WARNING: DOS-compatible mode is deprecated. It's strongly recommended to
         switch off the mode (command 'c') and change display units to
         sectors (command 'u').

Command (m for help): n
Command action
   e   extended
   p   primary partition (1-4)
p
Partition number (1-4): 1
First cylinder (1-1305, default 1):
Using default value 1
Last cylinder, +cylinders or +size{K,M,G} (1-1305, default 1305): +500M

Command (m for help): t
Selected partition 1
Hex code (type L to list codes): 83

Command (m for help): n
Command action
   e   extended
   p   primary partition (1-4)
p
Partition number (1-4): 2
First cylinder (65-1305, default 65):
Using default value 65
Last cylinder, +cylinders or +size{K,M,G} (65-1305, default 1305):
Using default value 1305

Command (m for help): t
Partition number (1-4): 2
Hex code (type L to list codes): 83

Command (m for help): w
The partition table has been altered!

Calling ioctl() to re-read partition table.
Syncing disks.
[hzz@magedu ~]$ sudo mkfs.ext4 /dev/sdb1
mke2fs 1.41.12 (17-May-2010)
/dev/sdb1 alignment is offset by 512 bytes.
This may result in very poor performance, (re)-partitioning suggested.
Discarding device blocks: 完成
文件系统标签=
操作系统:Linux
块大小=1024 (log=0)
分块大小=1024 (log=0)
Stride=4 blocks, Stripe width=0 blocks
130560 inodes, 522080 blocks
26104 blocks (5.00%) reserved for the super user
第一个数据块=1
Maximum filesystem blocks=67633152
64 block groups
8192 blocks per group, 8192 fragments per group
2040 inodes per group
Superblock backups stored on blocks:
        8193, 24577, 40961, 57345, 73729, 204801, 221185, 401409

正在写入inode表: 完成
Creating journal (8192 blocks): 完成
Writing superblocks and filesystem accounting information: 完成

This filesystem will be automatically checked every 35 mounts or
180 days, whichever comes first.  Use tune2fs -c or -i to override.
[hzz@magedu ~]$ sudo mkfs.ext4 /dev/sdb2
mke2fs 1.41.12 (17-May-2010)
Discarding device blocks: 完成
文件系统标签=
操作系统:Linux
块大小=4096 (log=2)
分块大小=4096 (log=2)
Stride=1 blocks, Stripe width=0 blocks
622592 inodes, 2490075 blocks
124503 blocks (5.00%) reserved for the super user
第一个数据块=0
Maximum filesystem blocks=2550136832
76 block groups
32768 blocks per group, 32768 fragments per group
8192 inodes per group
Superblock backups stored on blocks:
        32768, 98304, 163840, 229376, 294912, 819200, 884736, 1605632

正在写入inode表: 完成
Creating journal (32768 blocks): 完成
Writing superblocks and filesystem accounting information: 完成

This filesystem will be automatically checked every 27 mounts or
180 days, whichever comes first.  Use tune2fs -c or -i to override.
[hzz@magedu ~]$
步骤三:挂载分区
挂载 /dev/sdb1 到 /root/boot ;挂载 /dev/sdb2 到 /root/sdb2 。
[hzz@magedu ~]$ sudo su -
[root@magedu ~]# mkdir boot sdb2
[root@magedu ~]# mount /dev/sdb1 boot
[root@magedu ~]# mount /dev/sdb2 sdb2
[root@magedu ~]# exit
logout
[hzz@magedu ~]$
步骤四:安装 Grub
[root@magedu ~]# sudo grub-install --root-directory=/root /dev/sdb
Probing devices to guess BIOS drives. This may take a long time.
Installation finished. No error reported.
This is the contents of the device map /root/boot/grub/device.map.
Check if this is correct or not. If any of the lines is incorrect,
fix it and re-run the script `grub-install'.

(fd0)   /dev/fd0
(hd0)   /dev/sda
(hd1)   /dev/sdb
[root@magedu ~]#
步骤五:拷贝内核及 ramdisk 相关文件:
[hzz@magedu ~]$ sudo su -
[root@magedu ~]# cp -af /boot/vmlinuz-2.6.32-431.el6.x86_64 boot/
[root@magedu ~]# cp -af /boot/initramfs-2.6.32-431.el6.x86_64.img boot/
[root@magedu ~]# cd sdb2/
[root@magedu sdb2]# mkdir -p $(ls /)
[root@magedu sdb2]# exit
logout
[hzz@magedu ~]$
步骤六:拷贝命令相关文件
查看 bash 、 ls 、 cat 所依赖的库文件:
[hzz@magedu ~]$ ldd /bin/bash /bin/ls /bin/cat
/bin/bash:
        linux-vdso.so.1 =>  (0x00007fffaf1b2000)
        libtinfo.so.5 => /lib64/libtinfo.so.5 (0x00007f80e6998000)
        libdl.so.2 => /lib64/libdl.so.2 (0x00007f80e6794000)
        libc.so.6 => /lib64/libc.so.6 (0x00007f80e63ff000)
        /lib64/ld-linux-x86-64.so.2 (0x00007f80e6bbe000)
/bin/ls:
        linux-vdso.so.1 =>  (0x00007fffab1ff000)
        libselinux.so.1 => /lib64/libselinux.so.1 (0x00007f7a71615000)
        librt.so.1 => /lib64/librt.so.1 (0x00007f7a7140d000)
        libcap.so.2 => /lib64/libcap.so.2 (0x00007f7a71208000)
        libacl.so.1 => /lib64/libacl.so.1 (0x00007f7a71000000)
        libc.so.6 => /lib64/libc.so.6 (0x00007f7a70c6c000)
        libdl.so.2 => /lib64/libdl.so.2 (0x00007f7a70a67000)
        /lib64/ld-linux-x86-64.so.2 (0x00007f7a71839000)
        libpthread.so.0 => /lib64/libpthread.so.0 (0x00007f7a7084a000)
        libattr.so.1 => /lib64/libattr.so.1 (0x00007f7a70645000)
/bin/cat:
        linux-vdso.so.1 =>  (0x00007fff309ff000)
        libc.so.6 => /lib64/libc.so.6 (0x00007f9183537000)
        /lib64/ld-linux-x86-64.so.2 (0x00007f91838d0000)
[hzz@magedu ~]$
拷贝相关文件到 /root/sdb2 的相关目录:
[hzz@magedu ~]$ sudo su -
[root@magedu ~]# cp -avf /bin/bash /bin/ls /bin/cat sdb2/bin/
"/bin/bash" -> "sdb2/bin/bash"
"/bin/ls" -> "sdb2/bin/ls"
"/bin/cat" -> "sdb2/bin/cat"
[root@magedu ~]# cp -avLf $(ldd /bin/bash /bin/ls /bin/cat|egrep -o /lib64.*[[:space:]]) sdb2/lib64/
"/lib64/libtinfo.so.5" -> "sdb2/lib64/libtinfo.so.5"
"/lib64/libdl.so.2" -> "sdb2/lib64/libdl.so.2"
"/lib64/libc.so.6" -> "sdb2/lib64/libc.so.6"
"/lib64/ld-linux-x86-64.so.2" -> "sdb2/lib64/ld-linux-x86-64.so.2"
"/lib64/libselinux.so.1" -> "sdb2/lib64/libselinux.so.1"
"/lib64/librt.so.1" -> "sdb2/lib64/librt.so.1"
"/lib64/libcap.so.2" -> "sdb2/lib64/libcap.so.2"
"/lib64/libacl.so.1" -> "sdb2/lib64/libacl.so.1"
cp: 警告:指定来源文件"/lib64/libc.so.6" 多于一次
cp: 警告:指定来源文件"/lib64/libdl.so.2" 多于一次
cp: 警告:指定来源文件"/lib64/ld-linux-x86-64.so.2" 多于一次
"/lib64/libpthread.so.0" -> "sdb2/lib64/libpthread.so.0"
"/lib64/libattr.so.1" -> "sdb2/lib64/libattr.so.1"
cp: 警告:指定来源文件"/lib64/libc.so.6" 多于一次
cp: 警告:指定来源文件"/lib64/ld-linux-x86-64.so.2" 多于一次
[root@magedu ~]# sync
[root@magedu ~]# chroot sdb2
bash-4.1# ls
bin  boot  dev  etc  home  lib  lib64  lost+found  media  mnt  opt  proc  root  sbin  selinux  srv  sys  tmp  usr  var
bash-4.1# exit
exit
[root@magedu ~]# exit
logout
[hzz@magedu ~]$
步骤七:新建 grub.conf
新建 /root/boot/grub/grub.conf 文件,并填入以下内容:
default=0
timeout=5
hiddenmenu
title Magedu TEST
        root (hd0,0)
        kernel /vmlinuz-2.6.32-431.el6.x86_64 ro root=/dev/sdb2 selinux=0 init=/bin/bash
        initrd /initramfs-2.6.32-431.el6.x86_64.img
步骤八:将新硬盘设置为第一启动项
 ### 步骤九:启动系统
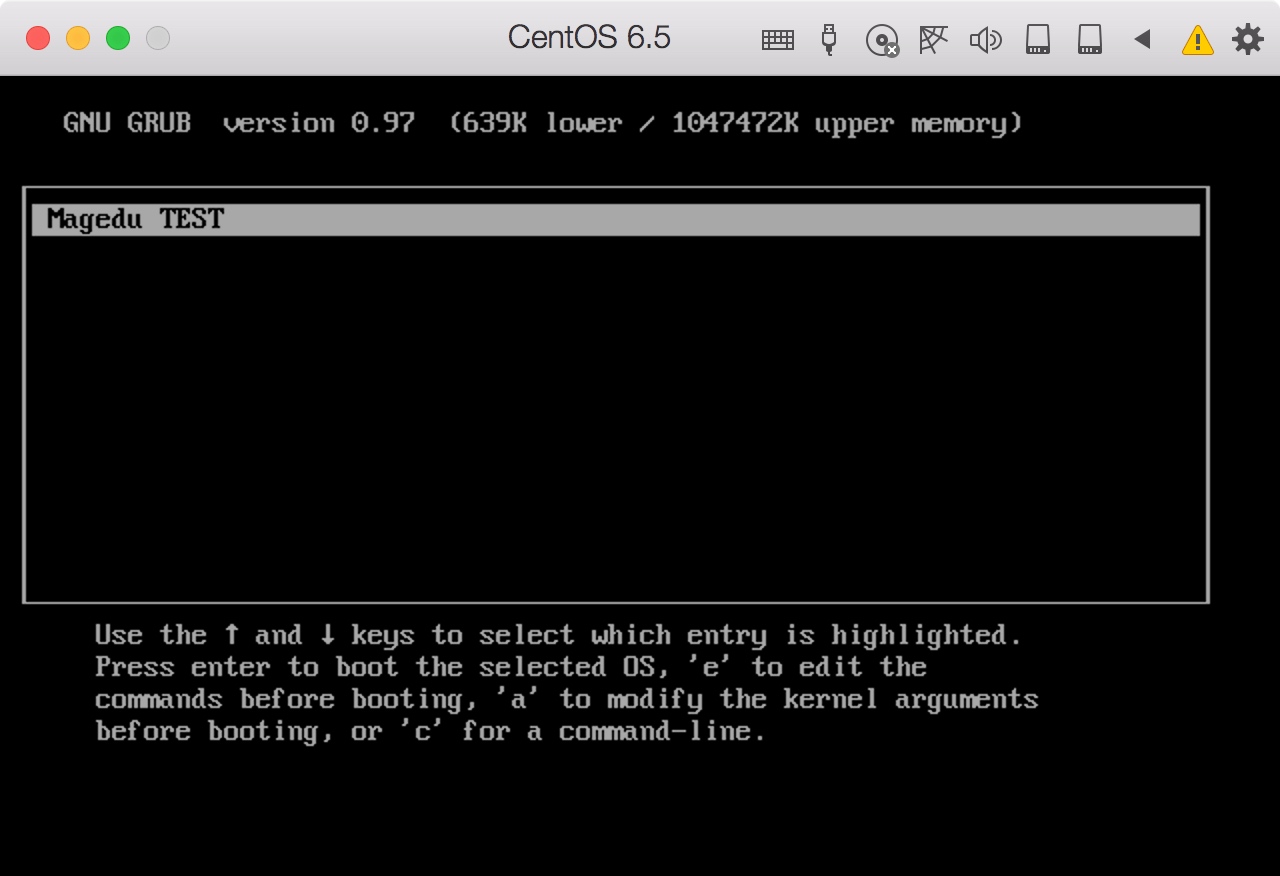
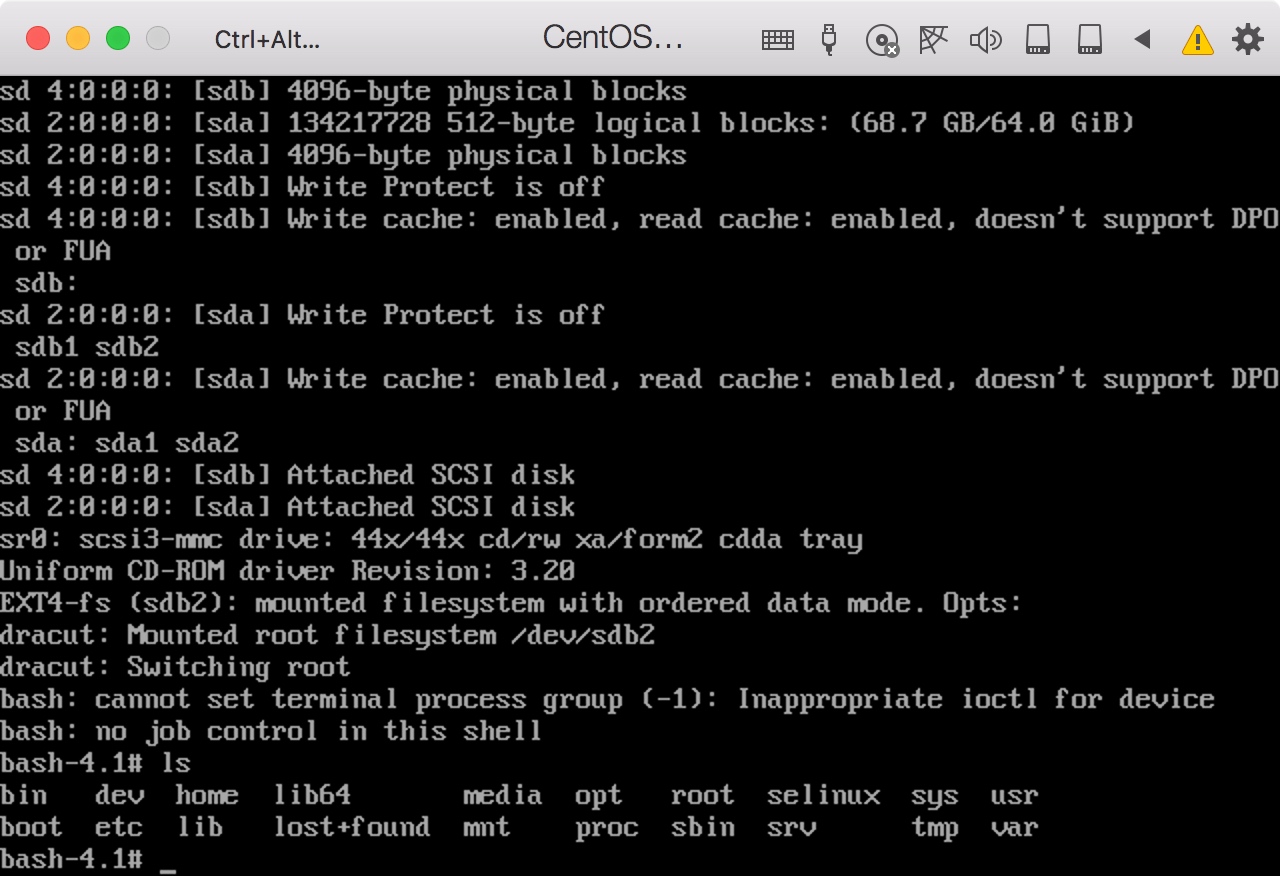 系统启动成功。
3、制作一个 kickstart 文件以及一个引导镜像。描述其过程。
步骤一:编写 kickstart 配置
[root@magedu ~]# more kickstart-hzz.cfg
# Kickstart file automatically generated by www.huangzz.xyz .

#version=DEVEL
# 运行方式:install 或 upgrade
install
# 运行介质
cdrom
# 使用 tui 界面安装
text
# 设置语言类型(必须)
lang zh_CN.UTF-8
# 设置键盘类型(必须)
keyboard us
# 设置网络
network --onboot yes --device eth0 --bootproto dhcp --noipv6
# 跳过不支持的硬件(一般来说不影响,生产系统谨慎使用)
unsupported_hardware
# 设置 root 密码(必须)
rootpw  --iscrypted $6$Ptaz13vXh7ghUtmc$NkrYZFn6W45QlKUGjZw1uc/ax0ThyXXc8mQIOdF8PzSZ8.RAoFtCdfQPUHSJWS5oBCsclT2a.ua3iD1Q2qw1X/
# 设置防火墙
firewall --disabled
# 设置密码校验方式(必须)
authconfig --enableshadow --passalgo=sha512
# 设置 SELinux
selinux --disabled
# 设置时区(必须)
timezone --utc Asia/Shanghai
# 设置引导参数(必须)
bootloader --location=mbr --driveorder=sda --append="crashkernel=auto rhgb quiet"

######## 设置磁盘分区开始(必须) ########
# The following is the partition information you requested
# Note that any partitions you deleted are not expressed
# here so unless you clear all partitions first, this is
# not guaranteed to work
# 清除分区
clearpart --all --drives=sda
# 清除分区表
zerombr
# 创建 boot 分区
part /boot --fstype=ext4 --size=500
# 创建 pv
part pv.008002 --grow --size=1
# 创建 vg
volgroup vg_magedu --pesize=4096 pv.008002
# 创建 lv
logvol /home --fstype=ext4 --name=lv_home --vgname=vg_magedu --grow --size=100
# 创建 lv
logvol / --fstype=ext4 --name=lv_root --vgname=vg_magedu --grow --size=1024 --maxsize=51200
# 创建 lv
logvol swap --name=lv_swap --vgname=vg_magedu --grow --size=2016 --maxsize=2016
######## 设置磁盘分区结束(必须) ########

# 设置软件仓库
#repo --name="CentOS"  --baseurl=cdrom:sr0 --cost=100

# 设置 url 方式的软件仓库(要确保设置的网络在安装过程中能联网)
# 最好不要用 https,否则可能会出现无法连接的问题
url --url=http://mirrors.aliyun.com/centos/6/os/x86_64/

# 安装完成后的行为
reboot

######## 指明要安装的程序包开始 ########
%packages --nobase
# 安装核心包组
@core
# 安装基本桌面包组
@basic-desktop
# 安装 http 服务程序包
httpd
# 不安装 php 程序包
-php
%end
######## 指明要安装的程序包结束 ########

######## 安装前脚本开始 ########
# 此时的 Linux 系统环境为微缩版环境,脚本应尽可能简单。
# 示例
%pre
#!/bin/sh
echo "start install..."
%end
######## 安装前脚本结束 ########

######## 安装后脚本开始 ########
# 此时的 Linux 系统环境为已经安装完成的系统。。
# 示例
%post
#!/bin/sh
echo "install complete..."
%end
######## 安装后脚本结束 ########
[root@magedu ~]# ksvalidator kickstart-hzz.cfg # 检查语法错误
[root@magedu ~]#
步骤二:创建 MyISO 目录
# 创建 MyISO 目录
[hzz@magedu ~]$ mkdir MyISO

# 拷贝光盘内的 isolinux 到 MyISO 目录并设置可写
[hzz@magedu ~]$ cp -rf /media/isolinux MyISO/
[hzz@magedu ~]$ chmod +w -R MyISO/isolinux/
步骤三:修改 isolinux.cfg 配置
以下是我修改后的内容:
[hzz@magedu isolinux]$ pwd
/home/hzz/MyISO/isolinux
[hzz@magedu isolinux]$ more isolinux.cfg
default vesamenu.c32
#prompt 1
timeout 60

display boot.msg

menu background splash.jpg
menu title Welcome to Magedu CentOS 6.5!
menu color border 0 #ffffffff #00000000
menu color sel 7 #ffffffff #ff000000
menu color title 0 #ffffffff #00000000
menu color tabmsg 0 #ffffffff #00000000
menu color unsel 0 #ffffffff #00000000
menu color hotsel 0 #ff000000 #ffffffff
menu color hotkey 7 #ffffffff #ff000000
menu color scrollbar 0 #ffffffff #00000000

label linux
  menu label ^Install or upgrade an existing system (magedu)
  menu default
  kernel vmlinuz
  append initrd=initrd.img ks=https://www.huangzz.xyz/uploads/kickstart-hzz.cfg
label rescue
  menu label ^Rescue installed system
  kernel vmlinuz
  append initrd=initrd.img rescue
[hzz@magedu isolinux]$
由于我们是有目的性地进行制作,所以一些多余的选项可以去掉。
此处 ks 使用的是链接的方式,这样的好处是可以随时修改 ks 文件的内容,而无需重新制作 ISO 镜像;如果不确认安装的主机是否可以联网,也可以拷贝 ks 配置到 MyISO 目录,然后使用 ks=cdrom:/PATH/TO/KICKSTART_FILE 进行引用(注意 ks 文件里面的仓库连接,也要改为本地)。
若需要手动配置 IP 地址才可联网,在 append 最后添加 ip=IPADDR netmask=MASK gateway=GW dns=DNS_SERVER_IP 即可(注意 ks 文件里的 IP 配置也要同步修改)。
步骤四:创建 ISO
[hzz@magedu ~]$ mkisofs -R -J -T -v --no-emul-boot --boot-load-size 4 --boot-info-table -V "CentOS 6 x86_64 magedu boot" -c isolinux/boot.cat -b isolinux/isolinux.bin -o CentOS_6_x86_64_magedu.iso MyISO
I: -input-charset not specified, using utf-8 (detected in locale settings)
genisoimage 1.1.9 (Linux)
Scanning MyISO
Scanning MyISO/isolinux
Excluded: MyISO/isolinux/TRANS.TBL
Excluded by match: MyISO/isolinux/boot.cat
Writing:   Initial Padblock                        Start Block 0
Done with: Initial Padblock                        Block(s)    16
Writing:   Primary Volume Descriptor               Start Block 16
Done with: Primary Volume Descriptor               Block(s)    1
Writing:   Eltorito Volume Descriptor              Start Block 17
Size of boot image is 4 sectors -> No emulation
Done with: Eltorito Volume Descriptor              Block(s)    1
Writing:   Joliet Volume Descriptor                Start Block 18
Done with: Joliet Volume Descriptor                Block(s)    1
Writing:   End Volume Descriptor                   Start Block 19
Done with: End Volume Descriptor                   Block(s)    1
Writing:   Version block                           Start Block 20
Done with: Version block                           Block(s)    1
Writing:   Path table                              Start Block 21
Done with: Path table                              Block(s)    4
Writing:   Joliet path table                       Start Block 25
Done with: Joliet path table                       Block(s)    4
Writing:   Directory tree                          Start Block 29
Done with: Directory tree                          Block(s)    2
Writing:   Joliet directory tree                   Start Block 31
Done with: Joliet directory tree                   Block(s)    2
Writing:   Directory tree cleanup                  Start Block 33
Done with: Directory tree cleanup                  Block(s)    0
Writing:   Extension record                        Start Block 33
Done with: Extension record                        Block(s)    1
Writing:   The File(s)                             Start Block 34
 26.71% done, estimate finish Fri Nov  3 13:58:04 2017
 53.32% done, estimate finish Fri Nov  3 13:58:04 2017
 80.01% done, estimate finish Fri Nov  3 13:58:04 2017
Total translation table size: 4483
Total rockridge attributes bytes: 1360
Total directory bytes: 2048
Path table size(bytes): 26
Done with: The File(s)                             Block(s)    18576
Writing:   Ending Padblock                         Start Block 18610
Done with: Ending Padblock                         Block(s)    150
Max brk space used 0
18760 extents written (36 MB)
[hzz@magedu ~]$
步骤五:测试启动
加载自建的 ISO 镜像:
 启动后显示的菜单界面:
 从仓库下载 install.img 并进行安装:
 到这一步,基本就没问题了,静待安装成功即可。
更详细的 kickstart 配置说明,详见:《使用 kickstart 文件自动安装 CentOS》。


